
Garments Finishing Process
The garment’s Finishing process includes many processes, including ironing, attaching ticketing, Folding, and Packing. Product quality, performance, and product presentation depend on the garment’s finishing process; a good finishing process gives a factory a better result. I have given the process flow chart of the finishing process for both shirt and pant manufacturing. This article is about the Process Flow Chart and Layout of the Garments Finishing Process.
Flow Chart and Layout of the Finishing Process of Shirts and Pants of the Garments Industry:
Flow Chart and Layout of the Finishing Process/ section of Shirts and Pants of the Garments Industry:
Bottom (Pant) Garments Process Flow Chart
Goods Received from Washing
↓
Shade check
↓
Loop Allowance Cut
↓
Pocket Clean
↓
Top Side Thread Cut
↓
Top Side Quality Inspection
↓
Inside Thread Cut
↓
Inside Quality Inspection
↓
Inside Iron
↓
Thread Sucking
↓
Button Attach
↓
Button and Zipper Close
↓
Top side Body Iron
↓
Measurement
↓
Get Up Thread Cutting
↓
Final Quality Check
↓
Re-Iron
↓
Get Up Check
↓
Ticketing Attach
↓
Ticketing quality check
↓
Shade Grouping
↓
Folding
↓
Packing
↓
Internal Final Inspection
↓
Buyer Final Inspection
↓
Finished Goods Warehouse
Top Garments (Shirt) Garments Process Flow Chart
Box Placket Iron
↓
Button Whole Mark
↓
Button Attach (Non-wash)
↓
Top Side Thread Cut
↓
Top Side Quality Inspection
↓
Inside Thread Cut
↓
Inside Quality Inspection
↓
Button Attach (Wash programme)
↓
Thread Sucking
↓
Button Close and Garments Iron
↓
Body Iron
↓
↓
Get Up Thread Cut
↓
Final Check
↓
Re-Iron
↓
Get Up Check
↓
Ticketing Attach
↓
Shade Grouping
↓
Folding
↓
Packing
↓
Internal Final Inspection
↓
Buyer Final Inspection
↓
↓
Shipment
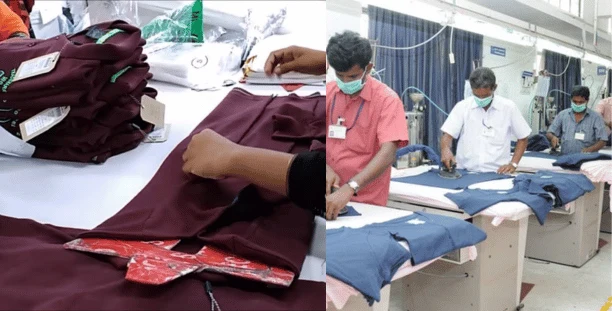
Garments Finishing Process
Details of the Flow Chart and the Layout of the Finishing Process/section of Shirts and Pants of the Garments Industry:
- Finishing Input: After the sewing is completed, goods are sent to washing, sometimes in the embroidery or printing section, according to the buyer’s recommendation. Then comes the finishing section. It is the first step in starting the work.
- Sorting: After receiving the goods from washing, they sort the goods according to style, color, and size.
- Thread cutting: Many people work for extra thread cutting. They are divided into two groups. One cut inside thread, the other topside thread.
- Pressing/Ironing: After completing extra thread cutting, send the goods for ironing. Ironing is done for looking good and for actually getting into shape.
- Quality Inspection: In this step, the Quality team inspects the quality properly to meet the customer’s needs. If any fault is found, then take immediate action for rectification.
- Insert button or others: In this step, buttons or other trims are attached to garments.
- Measurement check: This step is a risky and challenging step. In this step, 100% measurement is done. They measure every point according to the buyer’s measurement sheet. If a (-/+) value is found, then send it to steam ironing.
- Hangtag: The Hangtag is the accessories, which is attached according to buyer comments.
- Billboard: Billboard or product code is attached to garments in this step, according to buyer comments
- Folding: In this step, the final garments are folded to get up. The folding system will be used for folding, which is approved by the buyer.
- Packing: After folding, the garments are ready to pack.
- Final inspection: This is the full and final inspection at the last stage before shipment. The garments are checked randomly here. If any mistake is found beyond the limit according to the AQL policy, all shipments might be canceled.
- Shipment: The passed goods are ready for shipment, which was our ultimate target.